Review · TOKYO
Japan: eSIM with Unlimited Local 4G/5G Data
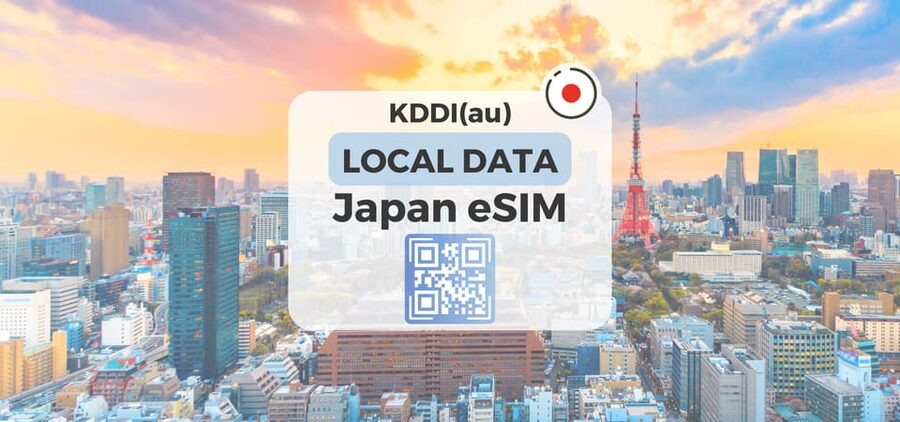
Your Japan data is ready before you land. This KDDI(au) eSIM experience lets you get fast local 4G or 5G in Honshu by scanning a code and connecting to the network, no SIM card fuss. I like that the setup is straightforward, and I like having a choice between Ultra (unthrottled) and Lite (speed-capped) to match your trip. The one clear drawback: there’s no voice calls or SMS, so you’ll lean on data-based messaging.
One more thing that matters in real life, the QR code in a voucher is not the eSIM code, and your eSIM QR is sent by email about a day before your activity date. After you arrive in Japan, you’ll connect the eSIM to the local network and then you’re basically good to go, with the 5G signal sometimes switching to 4G indoors or underground.
Key takeaways
- KDDI(au) local network: your data runs on Japan’s KDDI(au) coverage area.
- Ultra vs Lite speed choices: Ultra is listed as unthrottled, while Lite caps max speed at 10Mbps.
- No calls or SMS: great for maps and chat, not for phone-texting.
- QR code timing matters: the right eSIM QR code arrives by email, about 1 day before your date.
- Hotspot is supported with limits: tethering works, but limitations depend on the plan.
- Quick troubleshooting steps: if a QR looks invalid, check for the new eSIM under your SIM settings.
eSIM setup that actually works: what to scan and when
If you’ve ever wrestled with a travel SIM, you know the pain point is rarely the phone, it’s the timing and the right code. Here, the key detail is simple but important: the QR code on the GetYourGuide voucher is not the eSIM QR code you need. Your actual eSIM QR code is delivered separately via email, 1 day before the activity date.
That timing matters because you do not want to “install first, sort it later” while you are still packing. I suggest you check your email the day before, save the QR code, and do a quick scan test only when you have your phone ready. If you’re the kind of person who likes to plan, this is a nice way to get the annoying part handled at home.
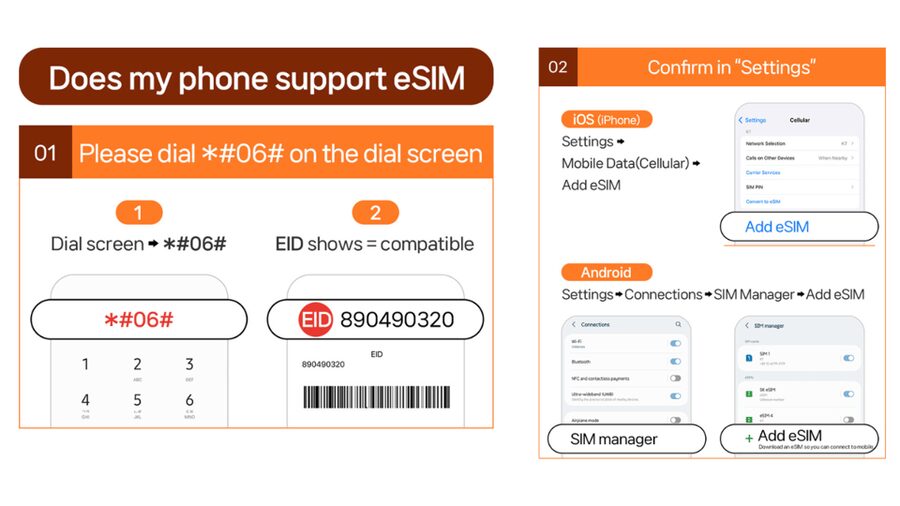
Before you buy, confirm your phone can use an eSIM. The fastest check is dialing #06# and seeing whether an EID number shows. If it does not show, the device is incompatible with eSIM and you should not spend time troubleshooting something that cannot work.
Also, make sure your phone is unlocked for a foreign SIM or eSIM. If it’s locked to one carrier, your eSIM may not activate correctly. This is one of those boring details that saves hours.
Finally, note the install window: the eSIM QR code must be installed and activated within 30 days of purchase. That’s enough time for most travel plans, but it’s still a good reminder to avoid long delays after you buy.
You can also read our reviews of more tours and experiences in Tokyo.



“Ultra” or “Lite”: choosing the plan that matches your pace
This is where you can get real value, because the product gives you two different styles of data access.
Ultra plan (Unthrottled local data)
The Ultra option is listed as unlimited local data on the KDDI(au) network with No Throttling for unlimited 5G/4G local data. That’s a strong fit if you rely on maps constantly, watch videos on the go, upload photos in bursts, or you want peace of mind when your schedule gets chaotic.
Ultra also supports a longer time range, up to 30 days. If you’re doing a longer Honshu trip or combining multiple legs, Ultra is the option that tends to feel least stressful.
Lite plan (Speed-capped unlimited data)
The Lite option is also unlimited local data, but max data speed is listed as 10Mbps. It’s still plenty for navigation, social apps, and normal day-to-day browsing, but if you plan to stream heavily or tether lots of devices, you might feel the limit.
Lite is available for 3 to 10 days. That shorter duration can make it a better match if you only need connectivity for a tighter trip.
The “days” detail that can surprise you
Lite has a specific usage calculation rule: days are based on calendar days, starting from the first connection to the KDDI(au) network in Japan. Example detail is provided in the product info: activation at 10 PM Japan time counts as 1 full day by midnight.
In practice, that means when you arrive, connect your eSIM soon after you land, so you don’t accidentally lose a calendar day. Ultra’s duration is also listed by plan length, but the explicit “calendar day counting” explanation is given for Lite, so I’d pay extra attention to Lite timing.



What about hotspot tethering?
Both plans list hotspot support with limitations depending on the plan. The big practical takeaway is: expect tethering to work, but don’t assume it will behave like your home Wi-Fi with unlimited speed for every connected device.
If you’re traveling as a couple or small group, you should plan around tethering being a helpful backup, not a guarantee of top speed for heavy use.
What happens after you arrive: getting online fast on Honshu
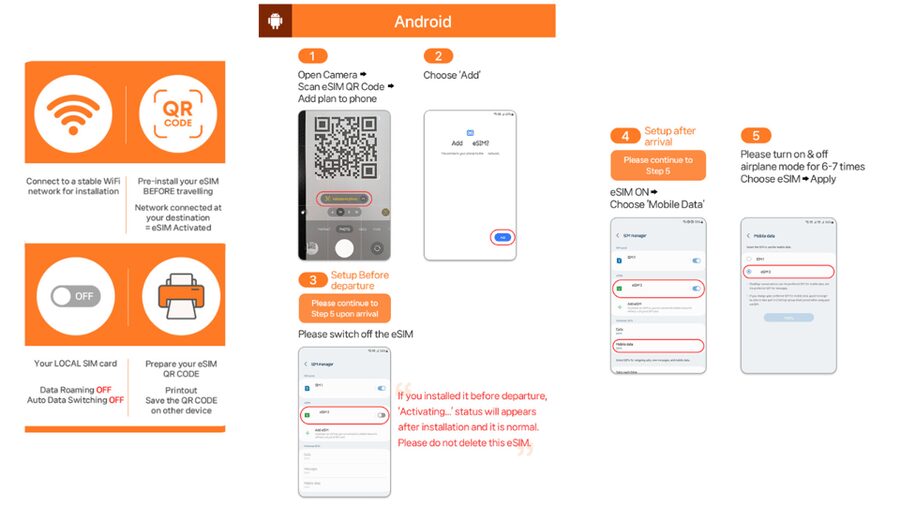
This eSIM does not connect until you’re in Japan. The product info is clear that your eSIM connects to the local network after you’ve arrived. That’s actually good news because it keeps you from burning your attention on activation while you’re on the airplane.
Once you’re in Honshu, you’ll scan and install using the eSIM QR code, then connect to the KDDI(au) local network. After that, you’re working with unlimited local data rather than a tiny data bucket.
Coverage is listed for Japan, and the experience is described as available even on subway rides. I would still treat underground stations and thick concrete areas as “expect some 4G behavior,” because the data spec also notes 5G can be affected by location like indoors, underground, or crowded areas. The phone may switch down to 4G, and that’s normal.
The practical result: you should plan for smooth navigation and messaging through most of your day, while knowing 5G is a best-case scenario. Either way, you’re not paying attention to data limits constantly, which is the real travel win.
Using it for navigation, chat, and everyday sightseeing
If your Japan day looks like maps plus a camera plus messaging, this plan fits your rhythm.
You get unlimited local 5G/4G data, which makes a huge difference when you’re bouncing between neighborhoods, hopping trains, and checking transit updates. You don’t have to choose between “one more photo upload” or “still have enough data for directions later.”
The no voice and no SMS part matters, though. You should assume you will not be able to rely on phone calls and traditional text messaging. In Japan, that’s usually fine because so much communication is app-based, but it can be an issue if you need SMS verification for anything before you depart.
So, before you land, do yourself a favor:
- Make sure any important logins or two-factor codes are handled without needing an in-trip SMS number.
- Download offline maps or key info you might need in case activation takes a few minutes.
Once you’re running, the best feeling is not thinking about your data. That’s where “unlimited” becomes more than a marketing word and becomes a stress reducer.
Hotspot on the move: tethering without wrecking your day
Hotspot sharing is listed as included, with limitations depending on the selected plan.
Here’s what you can safely plan for. Your phone can act as a router for another device, which is useful for a laptop, a tablet, or a companion phone that didn’t bring an eSIM. This matters especially when you’re on the move and Wi-Fi is unpredictable.
What you should not assume is that tethering will feel identical to your phone’s own data experience. Because the hotspot note includes limitations, you should expect at least some performance variability based on the plan and how busy the network is.
A smart move is to use hotspot for the essentials. Examples that usually work well:
- Sending messages and checking emails
- Using a laptop for documents and light browsing
- Keeping a second phone online for maps
For heavy video streaming on multiple devices at once, you might want to temper expectations, especially on Lite with the speed cap.
When the QR code says invalid: troubleshooting without panic
This is the moment that can make you either calm or crazy, so it helps to know the exact steps up front.
The product info gives you a specific checklist: if you see a QR code is invalid message or something similar, go to your phone’s settings and check for a new eSIM entry.
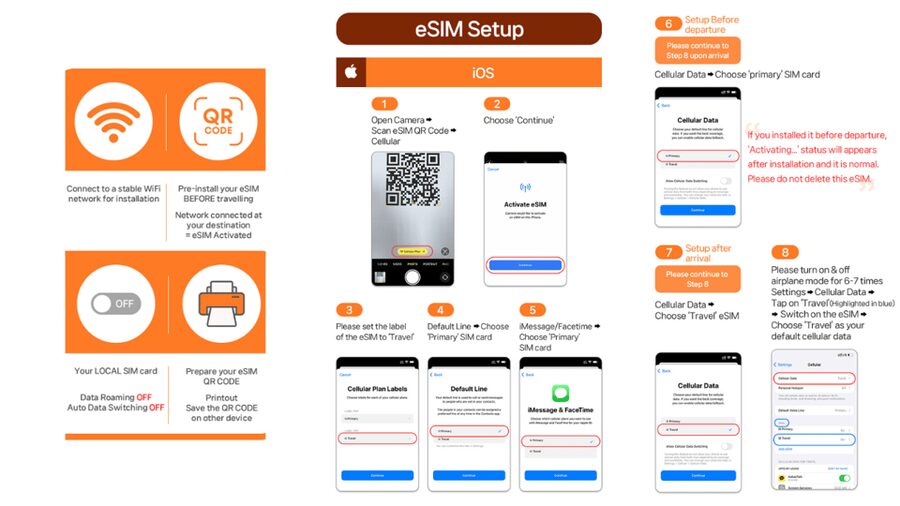
For iOS, check under Settings > Cellular.
For Android, check under Settings > Connections > SIM Manager.
What you’re looking for is whether a new eSIM is showing up on that page. Sometimes the QR scan doesn’t “feel” successful because the screen message is confusing, but the eSIM actually gets added behind the scenes.
If you still hit issues, contact the supplier. The info suggests reaching out via the supplier’s email or WhatsApp.
If you’re prone to last-minute stress, here’s a practical habit: after you install, do a quick connectivity check right away once you arrive. Try opening a web page and loading a map route. If it’s working, great. If it’s not, you want to know within minutes, not after you’ve missed a train.
5G in real life: when it drops to 4G and what to do
The product info is honest: 5G signal may be affected by where you are, like indoors, underground, or crowded areas. That means your phone may switch to 4G.
You do not need to treat that as a failure. It’s part of how wireless works. The important part is that you still have unlimited local data even when the network switches. So the difference is usually speed, not whether you can connect.
If you’re aiming for speed:
- Step closer to windows or above ground when you can.
- If the app you’re using feels slow, give it a moment, then refresh.
- Assume 4G during station time and 5G once you’re out in the open.
The good news is that signal on subways is specifically called out as available. So even when you dip down into the underground world, you should not expect a “no service” situation.
Value check: is $10 for unlimited data actually worth it?
At $10 per person, the value is pretty straightforward. You’re paying a small upfront cost to avoid the two common data-travel headaches:
- Running out of data mid-day and scrambling for Wi-Fi
- Overpaying for top-up data when your plans expand
Unlimited local data is particularly valuable in Japan because so much of your travel depends on real-time info. Transit changes, station navigation, and map-based routes are all data-driven. If you’re the type who uses your phone as your main tool, unlimited is less about streaming and more about staying oriented.
Ultra is the better fit if you want unthrottled behavior and longer days, up to 30. Lite is the better fit if you want the lowest cost while still getting unlimited data for a shorter trip, especially if you don’t stream heavily.
One more value angle: hotspot support. If you’re traveling with someone who also needs data, hotspot can reduce the need for a second separate plan.
Still, make sure you can live without voice and SMS. If you need frequent SMS-based services, this plan might feel limiting. If not, then unlimited data plus hotspot is a strong deal.
Who this eSIM fits best, and who should think twice
This is a great fit for you if:
- You have a phone compatible with eSIM and can dial #06# to confirm EID shows.
- Your phone is unlocked for foreign eSIM use.
- You want unlimited local 4G/5G in Japan without swapping physical SIMs.
- You rely on maps, messaging apps, and data-heavy planning.
It might not be the best fit if:
- You depend on calls or SMS for anything essential.
- Your phone cannot use eSIM, even if you follow every step perfectly.
- You need unlimited tethering across many heavy devices at once, because hotspot is listed with limitations and Lite has a speed cap.
If you want low friction, this plan is the kind of travel tool that makes your day easier. The “best” way to enjoy it is to set it up correctly before you land, then connect on arrival and test early.
Should you book this Japan unlimited data eSIM?
If you’re traveling on Honshu and want a simple way to stay connected with unlimited local 5G/4G, I think this is a solid booking. The biggest strengths are the quick QR-based setup approach and the practical reality that the connection is described as working even on subway rides, with 5G switching to 4G when conditions require it.
Choose Ultra if you want the smoothest experience and longer duration, up to 30 days. Choose Lite if you want the shorter time window and a cost-conscious option, understanding the 10Mbps max speed detail and the Lite calendar-day counting rule.
My final advice: only buy after confirming eSIM support and making sure your phone is unlocked. If that checks out, this plan can save you from the annoying data-counting mindset and help you focus on getting around Japan.
FAQ
Do I need the QR code from the voucher to install the eSIM?
No. The QR code on the voucher is not the eSIM QR code you need. The eSIM QR code is delivered separately via email 1 day before your activity date.
How do I confirm my phone supports eSIM?
Dial *#06# on your phone and check whether an EID shows. If it does not show, the device is incompatible with eSIM.
When does the eSIM connect to the local network in Japan?
The eSIM will connect to the local network after you have arrived in Japan.
What’s the difference between Ultra and Lite?
Ultra is listed as unlimited 5G/4G local data with no throttling. Lite is also unlimited 5G/4G local data, but max data speed is listed as 10Mbps.
Does this plan include voice calls and SMS?
No. Voice and SMS are listed as N/A.
Can I use hotspot tethering with this eSIM?
Hotspot sharing is included, with limitations depending on the selected plan.
What should I do if I see an error like QR code is invalid?
Check your phone’s SIM or eSIM settings. On iOS, look under Settings > Cellular. On Android, look under Settings > Connections > SIM Manager. If you still have problems, contact the supplier via email or WhatsApp.